


SongerPro


1. Rearrange setlist even on the fly
Place your finger on the track you wish to move to a
different position and keep it there for a second or so, then
drag the track to the new position. Hint: Drag the track just
below the line where you want it to be.
2. Change the colour of the setlist
If your not a fan of the multi coloured display of the setlist
then you can change it to a plain black background.
Go into Options and tick the box labelled Single Colour
Playlist Background , this option also highlights the selected
track.
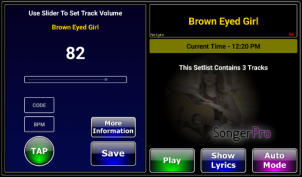
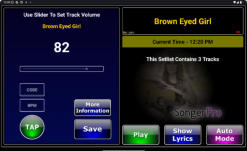
3. Adjust and set the volume of a single track
Select the track you want to adjust and place your finger on
the top Title Bar for a second or so.
The Set Volume Track screen will appear, start the
playback of the track and adjust the volume by using the
slide bar then press save.
This track will remain at the set volume until you re-edit it.
4. Search for a track
If you briefly touch the Title Bar for a moment the Track
Search option will appear.
This feature allows you to search your Master Songlist by just typing in a few letters of the track title, the
more you enter the narrower the search result! - When you select the track you want it will be placed as
next to play in the setlist.
If you are using this feature whilst already playing a track then it will be placed so it will play after the
current track.
5. Inserting Auto Pause commands for use with the Auto Mode setting
The idea behind the Auto Mode function is so you can create a setlist where you can say play 2 or 3 tracks
one after the other and then insert a pause in the set so you can engage with your audience. To do this first
press the Open Setlists button then select Edit Setlists, select the setlist you want to use then press the Add
Auto Pause button. The Auto Pause will be added the END of the list, you can then drag it to the position
you require - you can insert as many pause commands as you wish.
If you want to delete a pause command or any track for that matter just tap it briefly and the Remove Track
option will appear.
6. Using the On Screen Volume control
Go into the Options screen then press the Additional Settings button. You will see the tick box options to
show the control and also to keep the control visible on the screen - Note: This option only applies to the
playback screen (the one where you can see your tracks and the playbutton). Select which options you wish
to use then press Save Settings on both screens.
In order to see the control press the devices volume button, the control will now take control of the volume
and will remain on screen whilst the volume is being
adjusted.
Note: The right hand side of the track list will be disabled
from touch control whilst the volume control is visible, the
left hand side will behave as normal and allow the list to be
scrolled etc…
Pessing the volume number on the top of the display will
toggle Volume Mute
If you have enabled the Keep Volume Control Visible
option then pressing the devices UP volume will enable the
display whist pressing the DOWN volume will remove it.
7. Using the Split Screen and Extend View Area - Discontinued!
The split screen option is now the default setting when used in landscape view


8. Select next track to play
Whilst Songer is currently playing a track you can cue the next track to play simply by selecting it from the
list.
This option makes it much easier to select a different track from your list order should you change your
mind.
9. Section Looper - Now discontinued!
Discontinued in latest release due to not being compatible with MP4 files
10. Lyrics Text Formatter
This tool is hopefully an easier way of applying formatting to your Lyric Files by giving them coloured text,
larger fonts and block high lighting etc..
To access this page:
1. First open a setlist and choose a track with lyrics that
you wish to edit and press the Show Lyrics button.
2. Now press the Lyric Options button and place your
finger on the Settings button for a second or so and the
formatting page will appear.
3. Now press the Edit button and select the section of text
you wish to apply the formatting to.
Note: You select the text by placing your finger at the
beginning of the text and dragging over the text to the end
of the section - as if you were copy and pasting! You may
need to practice this a little because if you touch the text
background by mistake it will invoke the on-screen
keyboard and when you remove the keyboard from site it
will also remove your selection!
4. Now select the colour you want to apply and tick the
relevant text formats by touching the text in the boxes. In
this example we are going to use Blue text, make it Large
and Underscore it
5. Once these options have been selected press the Apply
Format button.
6. If you wish to remove the formatting, reselect the text
and press the Remove Format button. If you are happy
with the results you can carry on formatting a different
section or just press the Save button.
11. Rearrange & Remember Setlist Order
To re-arrange your setlist into an order of your choice just select the set you want to move and keep your
finger on it for a second or so then drag it to the new
position - thats it! - it is automatically saved.
Worth noting if you decide at any time you want to delete
a set from the list then the setlist order will revert back to
alphanumeric sort.
12. Create Setlist - Track Search Option
Whilst creating a new setlist or editing an existing one you now have the ability to search for a track.
in order to do this tap the Master Songlist header (orange text) this will invoke the search prompt, just type
in a word from the track you are looking for (the more you
type the narrower the results will be!) choose the track
from the results and this will give you the option to add it
to your set.
The search results are based on the tracks which have not
yet been added to your set so you cannot enter the same
track twice.
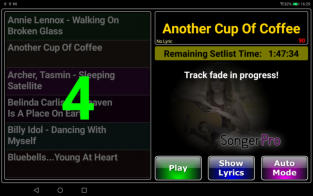
13. Track Fade
Selecting the Track Fade Out option from the Options
page will display a list of fade out times ranging from 0 -
21 seconds in 3 second steps.
When the Play button is pressed the Fade button is
displayed - pressing this button will commence the fade
out countdown.
This option also works with Mp4 files.
14. USB / Bluetooth Control
In order to set up the remote controls in Songer you must
first do the following:
USB - Connect your pedal/controller using a suitable OTG
adapter.
(Google OTG if you are not familiar with this)
BLUETOOTH - You must first PAIR your pedal/controller
with your Tablet or Phone and make sure it is connected.
Next open Songer and go into Options > Additional
Settings > Foot Control.
This will open the Remote Footswitch Control Setup page.
Tick the checkbox next to the operation you want, now
press the controller pedal/button you want it to use.
A number should appear in the box to the right of the
operation.
Repeat this for your available pedals etc
Now tick the Enable Playscreen Remote Commands
checkbox and press the Save button and exit the Options
screens.
Next open a setlist and check if your settings are working.
If you have an existing single button USB pedal then the old commands should still work ie; the letter P or
a number 0 (zero) just tick the Enable Remote Commands button and leave the command boxes at zero.
However, the best and most common commands to use are:
1. Left Arrow
2. Right Arrow
3. Up Arrow
4. Down Arrow
5. Page Up
6. Page Down
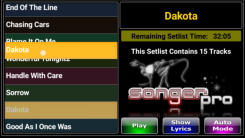
15. Scroll Speed & Track Volume indicators
New Indicator for Track Volume now added to
Playscreen to compliment the existing Scroll Speed
indicator together with a visual indication of any
associated lyric file.
Plus: New current Time indicator
Plus: Progress bar moved to left lower side when in
landscape mode.
16. Backup and Restore
There is a button in the Additional Settings called
Auto Backup.
This will give you the option to automatically backup your
settings etc at a given period ie;
1. Daily
2. Weekly
3. Monthly
4. No Backup
5. Backup Now (Immediately when pressed!)
All configuration and Setlist data are backed up to your
external SD card in three seperate folders.
SPData1
SPData2
SPData3
Tracks and Lyric files are NOT backed up, so make sure
you have a copy of these safely stored on your PC etc..
PLEASE NOTE:
The Backup Utility is only available if you have a external
SD card installed.
Your data can be restored at any time by pressing the
Restore button.
You will receive a prompt informing you of the date of the
last backup before restoring the data.
17. Lyric Guide Bar
There is now a option in the Additional Settings page to
activate a Lyric Guide Bar similar to the one found in the
Lyric Options page
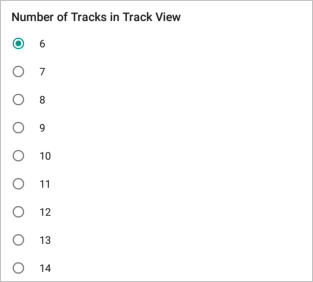
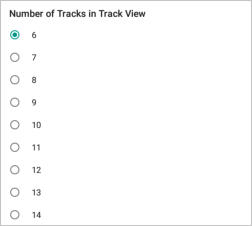
18. Track View Option
This new option allows you to set the number of tracks
which are displayed on the tracklist in the Playscreen.
To access this you must first go into the Options screen
and click the new Font Size & Tracks button.
You will then be presented with a prompt giving the
option to choose either:
SET NUMBER OF TRACKS
or
SET FONT SIZE
If you select the first option you will be asked to select the
number of tracks to display - between 6 & 14.
if you select a large number of tracks to display it may be
worthwhile reducing the size of the font in order to give a
better appearance.
Save settings and exit the Options screen.


Features & Instructions for use
Please note the following list does not contain details of recent
features which have been added to the later releases 9.5.0 onwards.
See the relevant release pages for more details.
1. Rearrange setlist even on the fly
2. Change the colour of the setlist view
3. Adjust and set the volume of an individual track
4. Search for a track in the Master Songlist
5. Inserting Auto Pause command when using the Auto Mode setting
6. On Screen volume control
7. Split screen and extended view area settings
8. Selecting the next track to play
9. Using the track Section Looper
10. Lyric view text formatting
11. Rearranging the setlist track playback order
12. Track search option when creating / editing a setlist
13. Track fade - additional option
14. Using remote control footswitch - Bluetooth and USB
15. Lyric scroll speed and track volume indicators
16. Backup and Restore
17. Lyric guide bar
18. Setlist track view options
19. Loop playback when using Lyric Options
Professional Backing Track Player for Android


Professional Backing Track Player for Android
1. Rearrange setlist even on the fly
Place your finger on the track
you wish to move to a different
position and keep it there for a
second or so, then drag the
track to the new position. Hint:
Drag the track just below the
line where you want it to be.
2. Change the colour of the
setlist
If your not a fan of the multi coloured display of the setlist then you
can change it to a plain black background.
Go into Options and tick the box labelled Single Colour Playlist
Background , this option also highlights the selected track.
3. Adjust and set the volume of
a single track
Select the track you want to
adjust and place your finger on
the top Title Bar for a second or
so.
The Set Volume Track screen
will appear, start the playback
of the track and adjust the
volume by using the slide bar then press save.
This track will remain at the set volume until you re-edit it.
4. Search for a track
If you briefly touch the Title Bar for a moment the Track Search
option will appear.
This feature allows you to search your Master Songlist by just typing in
a few letters of the track title, the more you enter the narrower the
search result! - When you select the track you want it will be placed as
next to play in the setlist.
If you are using this feature whilst already playing a track then it will
be placed so it will play after the current track.
5. Inserting Auto Pause commands for use with the Auto Mode
setting
The idea behind the Auto Mode function is so you can create a setlist
where you can say play 2 or 3 tracks one after the other and then
insert a pause in the set so you can engage with your audience. To do
this first press the Open Setlists button then select Edit Setlists, select
the setlist you want to use then press the Add Auto Pause button. The
Auto Pause will be added the END of the list, you can then drag it to
the position you require - you can insert as many pause commands as
you wish.
If you want to delete a pause
command or any track for that
matter just tap it briefly and
the Remove Track option will
appear.
6. Using the On Screen Volume
control
Go into the Options screen
then press the Additional
Settings button. You will see the tick box options to show the control
and also to keep the control visible on the screen - Note: This option
only applies to the playback screen (the one where you can see your
tracks and the playbutton). Select which options you wish to use then
press Save Settings on both screens.
In order to see the control press the devices volume button, the
control will now take control of the volume and will remain on screen
whilst the volume is being adjusted.
Note: The right hand side of the track list will be disabled from touch
control whilst the volume control is visible, the left hand side will
behave as normal and allow the list to be scrolled etc…
Pessing the volume number on the top of the display will toggle
Volume Mute
If you have enabled the Keep Volume Control Visible option then
pressing the devices UP volume will enable the display whist pressing
the DOWN volume will remove it.
7. Using the Split Screen and Extend View Area - Discontinued!
The split screen option is now the default setting when used in
landscape view.

8. Select next track to play
Whilst Songer is currently playing a track you can cue the next track to
play simply by selecting it from the list.
This option makes it much easier to select a different track from your
list order should you change your mind.
9. Section Looper - Now Discontinued!
Discontinued in later release due to not being compatible with MP4
files.
10. Lyrics Text Formatter
This tool is hopefully an easier way of applying formatting to your Lyric
Files by giving them coloured text, larger fonts and block high lighting
etc..
To access this page:
1. First open a setlist and
choose a track with lyrics that
you wish to edit and press the
Show Lyrics button.
2. Now press the Lyric Options
button and place your finger on
the Settings button for a
second or so and the formatting
page will appear.
3. Now press the Edit button
and select the section of text
you wish to apply the
formatting to.
Note: You select the text by
placing your finger at the
beginning of the text and
dragging over the text to the
end of the section - as if you
were copy and pasting! You may
need to practice this a little
because if you touch the text
background by mistake it will
invoke the on-screen keyboard
and when you remove the
keyboard from site it will also remove your selection!
4. Now select the colour you want to apply and tick the relevant text
formats by touching the text in
the boxes. In this example we
are going to use Blue text, make
it Large and Underscore it
5. Once these options have
been selected press the Apply
Format button.
6. If you wish to remove the
formatting, reselect the text and press the Remove Format button. If
you are happy with the results you can carry on formatting a different
section or just press the Save button.
11. Rearrange & Remember Setlist Order
To re-arrange your setlist into an order of your choice just select the
set you want to move and keep your finger on it for a second or so
then drag it to the new position
- thats it! - it is automatically
saved.
Worth noting if you decide at
any time you want to delete a
set from the list then the setlist
order will revert back to
alphanumeric sort.
12. Create Setlist - Track Search Option
Whilst creating a new setlist or editing an existing one you now have
the ability to search for a track.
in order to do this tap the Master Songlist header (orange text) this will
invoke the search prompt, just
type in a word from the track
you are looking for (the more
you type the narrower the
results will be!) choose the track
from the results and this will
give you the option to add it to
your set.
The search results are based on the tracks which have not yet been
added to your set so you cannot enter the same track twice.
13. Track Fade - Extra Options
Selecting the Track Fade Out
option from the Options page
will display a list of fade out
times ranging from 0 - 21
seconds in 3 second steps.
When the Play button is pressed
the Fade button is displayed -
pressing this button will
commence the fade out
countdown.
This option also works with
Mp4 files.
14. USB / Bluetooth Control
In order to set up the remote controls in Songer you must first do the
following:
USB - Connect your
pedal/controller using a suitable
OTG adapter.
(Google OTG if you are not
familiar with this)
BLUETOOTH - You must first
PAIR your pedal/controller with
your Tablet or Phone and make
sure it is connected.
Next open Songer and go into
Options > Additional Settings >
Foot Control.
This will open the Remote
Footswitch Control Setup page.
Tick the checkbox next to the operation you want, now press the
controller pedal/button you want it to use.
A number should appear in the box to the right of the operation.
Repeat this for your available pedal/buttons etc
Now tick the Enable Playscreen Remote Commands checkbox and
press the Save button and exit the Options screens.
Next open a setlist and check if your settings are working.
If you have an existing single button USB pedal then the old
commands should still work ie; the letter P or a number 0 (zero) just
tick the Enable Remote Commands button and leave the command
boxes at zero.
However, the best and most common commands to use are:
1. Left Arrow
2. Right Arrow
3. Up Arrow
4. Down Arrow
5. Page Up
6. Page Down
15. Scroll Speed & Track Volume indicators
New Indicator for Track Volume
now added to Playscreen to
compliment the existing Scroll
Speed indicator together with a
visual indication of any
associated lyric file.
Plus: New current Time indicator
Plus: Progress bar moved to left
lower side when in landscape
mode.
16. Backup and Restore
There is a button in the
Additional Settings called
Auto Backup.
This will give you the option to
automatically backup your
settings etc at a given period ie;
1. Daily
2. Weekly
3. Monthly
4. No Backup
5. Backup Now (Immediately
when pressed!)
All configuration and Setlist data
are backed up to your external
SD card in three seperate
folders.
SPData1
SPData2
SPData3
Tracks and Lyric files are NOT
backed up, so make sure you
have a copy of these safely
stored on your PC etc..
PLEASE NOTE:
The Backup Utility is only available if you have a external SD card
installed.
Your data can be restored at any time by pressing the Restore button.
You will receive a prompt informing you of the date of the last backup
before restoring the data.
17. Lyric Guide Bar
There is now a option in the
Additional Settings page to
activate a Lyric Guide Bar
similar to the one found in the
Lyric Options page
18. Track View Option
This new option allows you to
set the number of tracks which
are displayed on the tracklist in
the Playscreen.
To access this you must first go
into the Options screen and
click the new Font Size & Tracks
button.
You will then be presented with
a prompt giving the option to
choose either:
SET NUMBER OF TRACKS
or
SET FONT SIZE
If you select the first option you
will be asked to select the
number of tracks to display - between 6 & 14.
if you select a large number of tracks to display it may be worthwhile
reducing the size of the font in order to give a better appearance.
Save settings and exit the Options screen.


Features & Instructions for use
Please note the following list does not contain details of recent
features which have been added to the later releases 9.5.0 onwards.
See the relevant release pages for more details.
1. Rearrange setlist even on the fly
2. Change the colour of the setlist view
3. Adjust and set the volume of an individual track
4. Search for a track in the Master Songlist
5. Inserting Auto Pause command when using the Auto Mode setting
6. On Screen volume control
7. Split screen and extended view area settings
8. Selecting the next track to play
9. Using the track Section Looper
10. Lyric view text formatting
11. Rearranging the setlist track playback order
12. Track search option when creating / editing a setlist
13. Track fade - additional option
14. Using remote control footswitch - Bluetooth and USB
15. Lyric scroll speed and track volume indicators
16. Backup and Restore
17. Lyric guide bar
18. Setlist track view options
19. Loop playback when using Lyric Options


